Last Updated: 2026-03-06T13:56:50-07:00
Document generated from 08e6e0c
![]()
![]()
| Name | Date | Reason For Changes | Version |
|---|---|---|---|
Sean Marquez |
March, 2024 |
Removed Samsung camera from documentation |
3.0 |
Sean Marquez |
March, 2023 |
Updated testing procedures, as per @LeStarch edits |
2.0 |
Jess Bermudes |
July 27, 2022 |
Fix note about PTZ POE Splitter |
1.3 |
Jess Bermudes |
March 5, 2020 |
Update Room Setup per Sean’s notes |
1.2 |
Jess Bermudes |
March 4, 2020 |
Add caution for AV cables in Room Setup |
1.1 |
Jess Bermudes |
March 4, 2020 |
Update for 18x |
1.0 |
Sean Marquez |
February 24, 2020 |
Pre-release |
1.0-c |
Introduction
Welcome to the SCALE A/V Team! Thank you for volunteering your time to help make SCALE the most awesome volunteer-run Linux Conference in the world (If anyone says otherwise, they can take it up with Jess).
The A/V team is responsible for the setup and troubleshooting of the various audio and video equipment used throughout the conference in partnership with the Convention Center A/V vendor staff. Each room used for presentations will have a projector that can be connected to a presenter’s laptop, a sound system for sound reinforcement inside the room as well as a network-controlled camera with a connection to the sound system for recording and streaming of the presentation. A/V team members will report to and work from the A/V Network Operations Center (NOC) where, during their shift, they may either help with the monitoring of the video feeds of the various rooms via the Video Monitoring System or be dispatched to the field to troubleshoot an issue with a particular room. Volunteers should contact the A/V Team volunteer coordinator, Lan Dang, and register both their availability for work shifts and their preferred job assignment. Volunteers will be given access to documentation that explains the equipment in use at the conference and basic troubleshooting tips to be effective in the field.
Schedule Overview
SCALE is held Thursday through Sunday. However, volunteers are needed for setup on Wednesday as well as sometimes on Tuesday. Tuesday (afternoon): Retrieving equipment from the off-site storage facility, unpacking and setting up the A/V NOC, and potential room setups. Wednesday (all day): Deployment, setup, and testing of all conference room equipment. Thursday-Sunday (8am-6pm): Volunteers work in shifts as monitors or field techs. For evening events we will need one volunteer with audio mixer experience to help run the board. Sunday Evening: Teardown.
What We Do at SCaLE
The SCALE A/V Team is the team of volunteers responsible for setting up and running most of the audio and video equipment for each room of the conference. Our work provides several key features of SCALE:
-
In-room live sound reinforcement for conference speakers via microphones and loudspeakers
-
In-room video projection for slides and other graphics from conference speaker laptops
-
Live streaming of each talk via YouTube with both a view of the speaker via a camera and an embedded view of the slides
-
Recordings of each talk taken from the live stream
In order to provide these services, each room is equipped with devices to facilitate the capture and transmission of audio and video signals and provide it to the room and to the internet. Each room is connected to the A/V NOC:
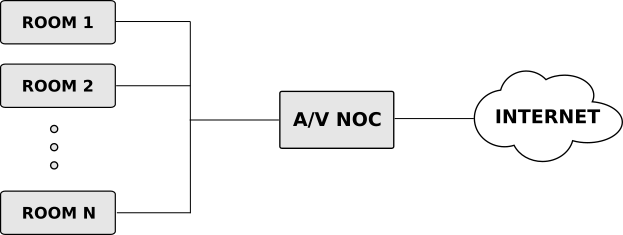
As shown above, each room is connected to the A/V NOC (Network Operations Center) for monitoring and recording purposes. We try to have as much control over the system as we can from the A/V NOC in order to centralize management and prevent having to staff each room with a technician.
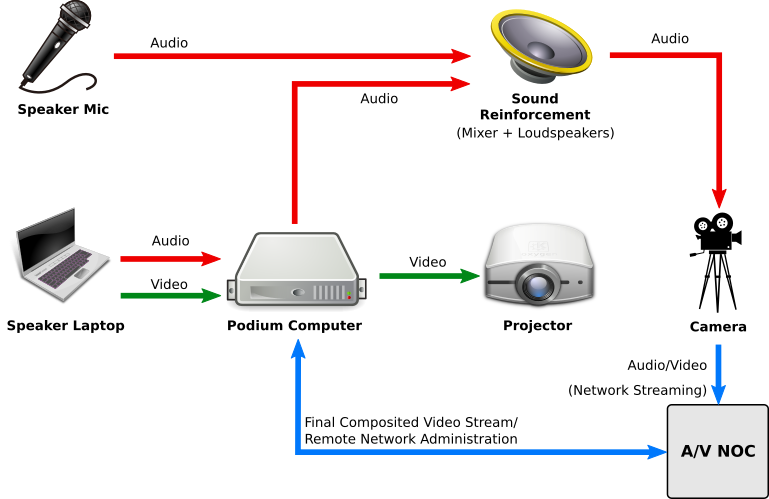
To carry out our mission, each room has audio, video, and networking equipment. The following diagram outlines the major connections between the various devices in the room:
Where We Do It
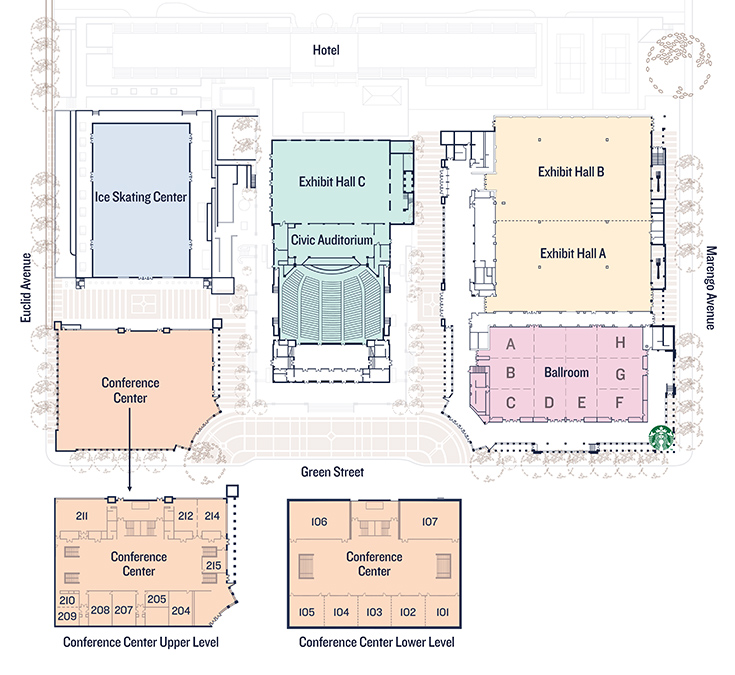
SCALE is at the Pasadena Convention Center.
Here is a map of the convention center:
Points of Interest
-
AV NOC: Room 204
-
Tech NOC: Room 215
-
Registration: Outside Exhibit Hall A
Audio Subsystem
A microphone is connected to the sound reinforcement system so that the audience may better hear the speaker. Each room usually has two microphones. One Countryman earset microphone with beltpack transmitter that is normally the primary microphone used by the presenter and one handheld wireless microphone as a backup for the presenter or for someone to give an introduction or to ask questions. The beltpack and the handheld microphone use disposable batteries and should the batteries need replacing, you can either acquire some from the A/V NOC or find spares near the sound mixer board in the conference room (sometimes inside a drawer). The specific transmission frequencies of the microphones is preconfigured by the convention center staff and should never be changed without permission from Michael Proctor-Smith.
If the speaker is using a laptop and has sound to play, they may also connect their laptop audio to the sound system via the combination HDMI Cable or VGA/Audio Cable that connects the Speaker’s Laptop to the Podium Computer. The Room Audio Mixer is setup by the convention center staff to combine the various audio sources into one master channel to be output via the room’s loudspeakers. We are also using our own Network-Controlled Audio Mixer that will take auxiliary output feeds split off from each channel of the Room Audio Mixer as input. This mix is what will be fed to the video camera to be recorded with the video stream. This additional setup will allow us to control from the A/V NOC the audio levels fed into the camera independently of the audio levels that are to be heard in the room.
Video Subsystem
Video of each talk is streamed live on YouTube on the SCaLE Youtube Channel. The video contains both the feed from the room’s camera and a feed of the slides combined together into a picture-in-picture style layout with the slides being the larger, primary video image for legibility and the room camera being the smaller, secondary image. The image below shows a sample frame of the final video output as shown on YouTube:

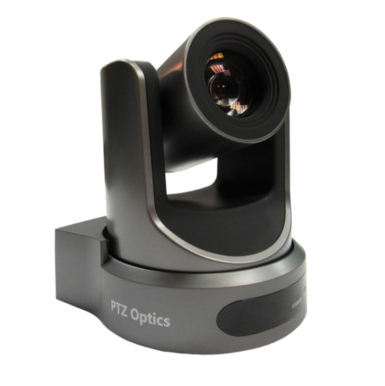
The cameras that provide the video of the speaker are special network-controlled Pan-Tilt-Zoom (PTZ) cameras. This allows us to remotely control where the camera is pointing at from the A/V NOC. The audio for the video stream is provided to the camera from the audio subsystem’s mixer. This audio track is multiplexed into the video stream by the camera and the resulting stream is made available over SCALE’s LAN to be viewed by either the NOC Monitoring System or the Podium Computer. You can think of the camera as a server that serves a video stream to any client that connects to it.
The following image shows the PTZOptics Camera in use.
The Podium Computer
The Podium Computer is at the heart of each room’s operation. This machine has two purposes:
-
Projector source switching. During a talk the video feed from the speaker’s laptop is fed into the Podium Computer and passed on to the projector. However, should a speaker not have a laptop connected, the Podium Computer can act as a backup source for the projector, showing a generic background image advertising the conference. Additionally, in between talks, the Podium Computer can also display a web page from the network that highlights upcoming talks or displays information related to conference sponsors.
-
Video stream compositing. This computer also creates the final video stream to be sent to YouTube. It has access to the room camera’s video stream via its network connection and is also able to capture a video stream of the slides being projected from its on-board video capture card. These two feeds are composited onto one canvas with an appropriate background image that will become the final video stream. All of the audio for the YouTube stream is provided by the camera over the network because the camera already received the audio from the sound reinforcement system’s mixer.
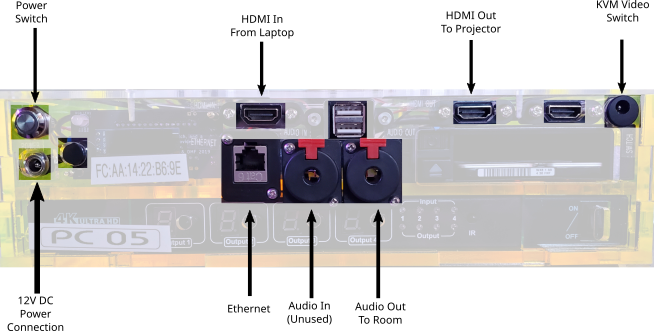
The follow image shows a podium computer. Note the I/O connectors on the front panel:
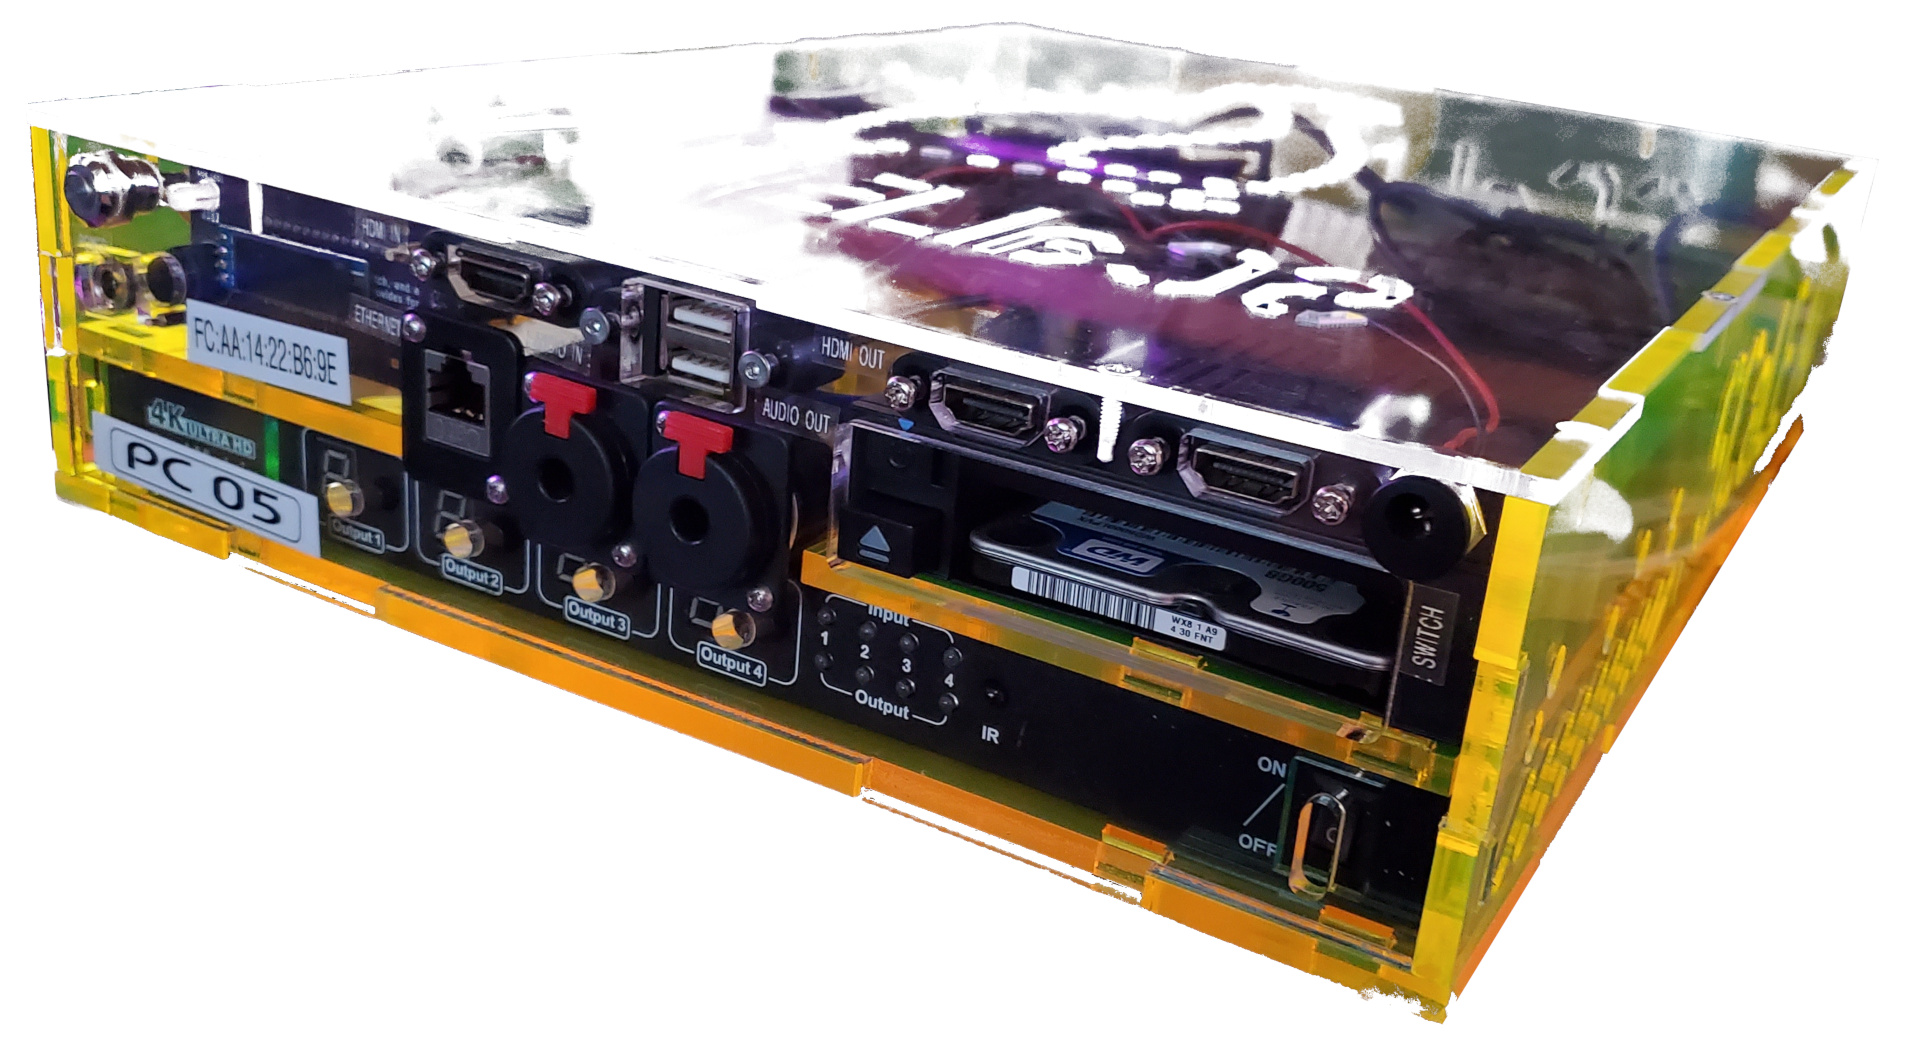
The following image shows a front view of the various I/O connections on the podium computer:
Room Setup
Network Mixer

-
❏ Place Network Mixer in a safe place near the In-Room Audio Mixer (either on the lower shelf below the mixer or on the same shelf as the mixer)
-
❏ Fold WiFi antenna down.
-
❏ Connect AC Adapter to Network Mixer. (Note: Do not turn on Network Mixer power switch yet.)
-
❏ Connect Network Mixer to Long Ethernet Cable to Network Switch.
-
❏ Connect the long in-room XLR Audio Cable to Network Mixer’s MIX L jack.
Tip: This XLR audio cable should already be ran along back of the room from camera to audio mixer.
-
❏ Using 3 sets of 1/4” TS Audio Cables and 1/4” TS-to-1/4” TRS Adapters, connect the following In-Room Audio Mixer INSERT Jacks to the corresponding Network Mixer channels (see diagram below):
-
❏ "Handheld Mic" to Network Mixer Ch. 1,
-
❏ "LAV Mic" to Network Mixer Ch. 2
-
❏ "DI" (Sometimes labeled "COMP") to Network Mixer Ch. 3.
Note: INSERT Jack on Zed 14 audio mixer is on top, whereas INSERT Jack on Mackie 1404 audio mixer it is on rear panel.
CAUTION: Make sure that the TRS side (the one with the adapter) is the side plugged into the In-Room Mixer.
-
-
❏ Set MIX L knob to the maximum position.
-
❏ Connect AC Adapter to Network Mixer and power outlet and Turn On power switch.
Camera DI Box
-
❏ Connect Long XLR Audio Cable to Female-Female XLR Coupler.
Note: Long XLR Audio Cable runs from audio mixer area to the back of the room near the camera.
-
❏ Connect Female-Female XLR Coupler to Camera DI Box.
Note: Camera DI Box should be placed on the floor near the tripod.
-
❏ Set ATT switch (on Camera DI Box) to 0dB.
-
❏ Set Ground Switch to OFF.
-
❏ Tape the DI Box to the tripod.

PoE Injector (for PTZOptics Camera)
-
❏ Using Short Ethernet Cable, connect Network Switch (any port from 22 to 27) to LAN IN Jack of TP-LINK PoE Injector
-
❏ Connect power to PoE Injector, using DC 48V AC Adapter.

PTZOptics Camera
-
❏ Unfold the tripod in the back of the room in the appropriate spot. (Look for the Ethernet cable and DI Box)
-
❏ Attach the PTZ Optics Camera (already screwed into mount) to the Tripod.
-
❏ Connect the Camera DI Box to the Camera with the 3.5mm TRS to Dual 1/4” TS Audio Cable, connecting the 1/4” plug to the DI Box PARPOUT Jack, and the 3.5mm TRS plug into the Camera’s LINE-IN jack.
-
❏ Ensure the Camera’s power switch is in the ON position.
-
❏ Connect the Long POE+Data Ethernet Cable coming from the POE injector to the POE Splitter on the Camera Mount. This will power on the camera.
-
❏ Raise the camera high enough so that it can look over anybody standing in the back of the room (approximately 8 feet). Lock the tripod height into place with the appropriate metal pins and tension knobs. Do not overtighten the tension knob.
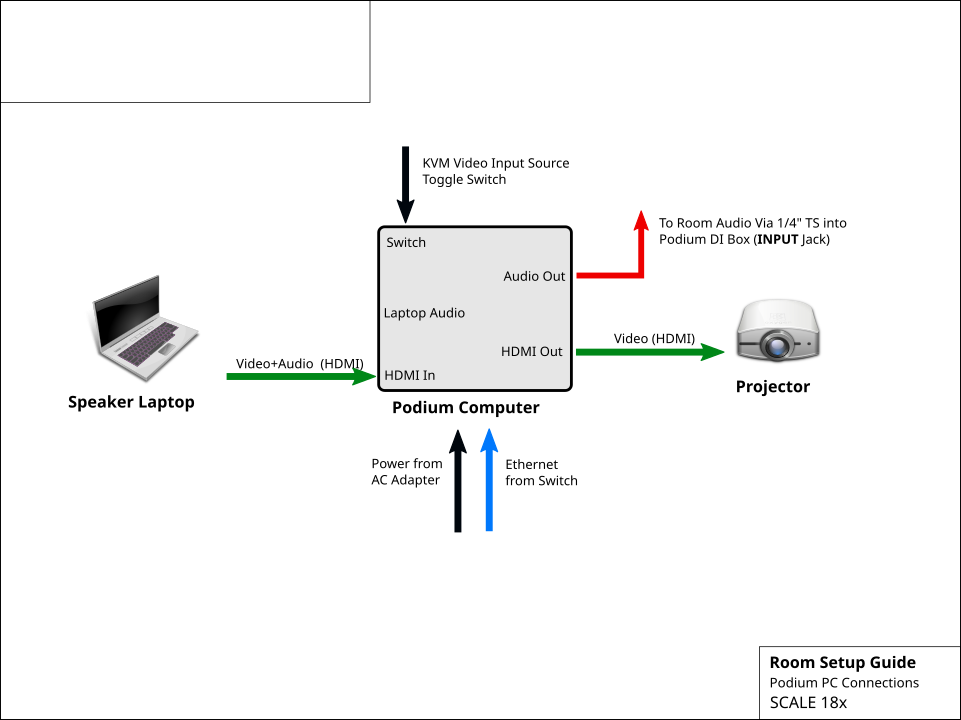
Podium Computer
-
❏ Place the computer on the shelf of the speaker’s podium.
-
❏ When connecting cables, you want to end with a clean and tidy set of cables running that are not in the way of the speaker and not a rats nest. Do not allow wires to dangle.
-
❏ Connect the Ethernet cable labeled “AV” coming from the network switch into the PC Ethernet jack. The other Ethernet cable labeled “Speaker” is for Presenter’s Laptop use. If the Ethernet cables are not already plugged into the network switch, you will need to connect the cables to the switches. Use an empty port in the AV VLAN range (22-27, confirm with diagram posted on Switch)
-
❏ Connect the HDMI plug (using the side without the adapters) of the Speaker’s Laptop HDMI/VGA/Audio cable to the HDMI In jack.
-
❏ Connect the HDMI cable going to the projector to the HDMI Out jack.
-
❏ Connect the KVM Source Switch to the Switch jack in the upper right by pushing in the connector. Do not screw the connector in.
-
❏ Plug the AC adapter power cord into a power outlet of the surge protector inside or near the podium.
-
❏ Connect the AC Adapter to the Podium Computer.
-
❏ Alert the NOC that the computer is connected and if instructed, press the Power Switch to power on the machine. The machine will turn on and the power button will light up green. If the computer does not come on, wait 45 seconds, watching the LCD screen on the front panel to see if penguins display on the screen.
-
❏ Confirm that the Podium Computer has a good network connection by looking at the inner motherboard through the clear right side wall of the computer. You should see both a solid blue Link light and a flashing orange Activity light from the right.
TIP: The light is located roughly underneath the penguin logo etched on top of the box.
-
❏ Test the KVM Video Switch by pressing the pushbutton on the KVM remote. Each time you press the remote, one of two lights near the bottom of the front of the computer will turn on, indicating which source is active.
-
❏ Tape the Laminated Speaker Reminder Flyer to the top of the podium.
-
❏ Tape the KVM switch about 6 inches from the bottom edge of the podium towards the left edge of the top of the podium.
-
❏ Tape down the HDMI Adapters Cable Set, leaving enough slack in the cable on the side with the adapters so that the presenter can comfortably plug the adapters into their laptop.
Room Testing Procedure
Each room needs to be tested for both audio and visual. In-room and recorded levels will be tested.
There are several notes to remember during the each test:
-
Almost all settings are adjusted remotely, please be patient.
-
Do not change things in-room unless directed by AV-NOC.
-
Please speak using our radio protocol as multiple teams will be working at once
-
When calling in a test please wait for acknologement from AV-NOC and proceed at AV-NOC’s pace.
-
When speaking in the microphone being tested, the goal is for the audio to be loud enough to be heard in a room full of people, but not so loud that it is painful or distorted.
-
Make sure that the camera stand is sufficiently elevated: as high as it can go and still be stable. Typically this is high enough to look over standing audience members (approximately 8 feet).
Additionally, volunteers will need the following equipment:
-
❏ Computer with HDMI, mini-HDMI, or USB-C video output.
-
❏ Device for playing MP3 with headphone jack
-
❏ A sample MP3 file can be downloaded from http://www.hyperion-records.co.uk/audiotest/1%20Sullivan%20The%20Lost%20Chord,%20Seated%20one%20day%20at%20the%20organ.MP3
-
-
❏ A loud speaking voice and much to talk about.
Testing Audio
There are two microphone channels and one audio feed that need to be tested. Each of these three channels should be tested in-order.
-
Countryman earset microphone (CH 1) worn over-the-ear
-
Handheld microphone (CH 2) held pointing at your mouth about 3in away
-
Audio source (CH 3) played into the 1/8" headphone jack on the podium
For each channel, follow this procedure:
-
❏ Call into AV-NOC reporting that your room is ready to test channel 1, 2, or 3.
-
❏ Wait for AV-NOC to confirm to proceed with test
-
❏ Talk into the microphone or play audio and report if the room audio is "too quiet", or "too loud"
-
❏ Continue talking as AV-NOC will adjust room levels while you are speaking
-
❏ Confirm when the room audio is properly set
-
❏ Continue talking as AV-NOC is now setting recorded levels
-
❏ Stop talking when AV-NOC confirms that the levels are set
-
❏ Proceed to next channel.
Testing Video
Testing video requires ensuing that the projector in the room and the recorded feed are both receiving video. To test, follow this procedure:
-
❏ Plug in an HDMI or HDMI compatible input to the HDMI cord on the podium using optional adapters
-
❏ Ensure projector projects feed from computer
-
❏ Call into AV-NOC asking to check remote video feed
-
❏ Confirm remote feed is as expected with AV-NOC
-
❏ Press video switcher pushbutton switch one time and ensure feed changed
-
❏ Press video switcher pushbutton switch one additional time and ensure feed changed back.
Corngradulations, the testing is now done. Please move to the next room as directed by AV-NOC.
Radio Checkout and Protocol
The SCALE A/V team uses two-way radios with headsets to keep everyone working during a shift in communication with each other. The radios are setup with two channels: A/V team and Tech Team. At the beginning of each shift you will check out a radio if you have not already done so and you are responsible for its safe return and check in at the end of your shift/day.
Radio Checkout Procedure
-
Only pick up fully charged radios from the charging station. (A green light in the charging cradle indicates full charge.)
-
Sign up on check out sheet with your name and time that the radio has been checked out.
-
You may also want to check out a headset. Make sure to plug the headset into the radio to test if it works.
-
To check a radio back in, put it back it in the charger to charge and log the check-in time on the sheet.
-
If you have taken a headset, keep it until the end of SCaLE. This is for sanitary purposes and so that you know that your headset works.
-
Please test your radio (and headset, if using one) before leaving the NOC to make sure it works properly and that you are on the correct channel!
Voice Technique
Communicating with a radio is an art. Both procedure (what you say), and technique (how you say it) is important so that all appropriate parties can communicate efficiently and effectively. In order to promote good communication, please observe the following techniques and procedures.
-
Listen for other traffic before pressing the transmit button, so you don’t accidentally talk over someone else who is already talking.
-
Hold the transmit button down for at least a second before speaking to ensure that the beginning of your message is not cut off.
-
Be aware of the position of the microphone in the radio chassis or external microphone in relation to your mouth so that you are able to transmit as clear a signal as possible, especially in noisy environments.
-
Speak slowly, distinctively, and clearly, making sure not to trail off in volume. This can take some practice. Sometimes it may help to read numbers off digit by digit if the number is important, such as a device diagnostic reading. When reading single alphabet letters, it might be more clear to use the phonetic alphabet (Alpha, Bravo, etc.) or simply a word that begins with that letter such as "T as in Thomas".
-
When you finish transmitting a message, release the transmit button immediately to return the radio to the receiving mode.
Voice Procedure
| Phrase | Explanation |
|---|---|
Alice FOR Bob. |
Begin all transmissions with a preamble to identify who you are addressing and who you are. |
GO FOR Bob |
To preserve clarity, the contacted party begins their message with their name. |
Alice, are you near the ballrooms? |
|
Bob, SAY AGAIN? OVER. |
If Alice did not understand Bob, she should request re-transmission by using the phrase “say again”. |
Alice, are you near the ballrooms?. |
|
Bob, AFFIRMATIVE. |
Affirmative/Negative are often used in place of yes/no to prevent the single syllable words from getting cut off in transmission. Note that affirmative/negative are responses to questions. |
Alice, can you go to Ballroom A and check the projector to see if it’s on? OVER. |
|
Bob, COPY. I’’ll head over there. |
The terms Copy/Roger are used to designate that you have received the transmission. Affirmative was not used here because Alice is signifying that she will comply with the request, despite Bob’s phrasing of the command as a question out of politeness. You may sometimes hear “Wilco”, which is short for “Will Comply”. |
A Primer on Digital Video
A video file is formatted in a specific file format called a container format.
Team Roles
Field Techs
Under most circumstances, presenters are capable of wiring themselves to the microphones and turning them on and off, as well as connecting their laptops to the projector system. But should an issue arise or should a special request be made, a member of the A/V team will be dispatched to the room to attempt to assess the situation, report any complications to the A/V NOC, and with the advisement of the NOC, carry out the appropriate solution in a manner that minimizes the disruption to both the presenter and the attendees. Generally, unless there is some technical issue that is preventing the talk from continuing, we do not go on stage and interrupt a speaker. Team members will be assigned a walkie-talkie for their shift so that they can stay in contact with the NOC while in the field. Certain special events such as panels, keynotes or specially configured rooms will require trained volunteers to be present in the conference room for the duration of the talk and operate an audio mixing board, adjusting audio levels to ensure quality of sound for the audience in the room.
Video Feed Monitors
Team members who volunteer to monitor the video feeds will work with a partner to watch the video streaming from all of the rooms that are broadcasting and use their surveillance capability to detect issues with the video stream, detect issues that may be occurring in the room such a projector malfunction, and to adjust the camera’s framing so as to ensure that the camera is pointed toward the front of the room and has the presenter visible within the frame. To see a detailed description of what Video Feed Monitors do, read the Video Monitoring Procedure.
The A/V NOC
The A/V NOC (Network Operations Center) is the headquarters of the A/V team. The NOC is located on the 2nd floor of the conference center, Room 204. Team members should report to the NOC at the beginning of their shift so that they can be assigned a task. When in the NOC, please talk quietly (like inside a library) because video feed monitors are trying to listen to the audio streams and staff needs to be able to hear about issues over the radio.
NOC Setup
The table for the radios should be sufficiently far away from the door to prevent people from running into it.
Audio/Video Glossary
Here are some terms you might read or hear during the weekend.
Amplifier: a device that produces a gain in signal level
Balanced Audio: An audio signal transmission strategy which sends an inverted copy with the original signal to allow devices to use the two copies to remove common noise common to both signals.
Bandwidth: The range of frequencies a signal occupies.
Compressor: A device which reduces the dynamic range of an audio signal.
Countryman: A brand of headset, earset, and lavalier microphones
DI Box: Also called a Direct box. It is said to stand for Direct Injection or Direct Input. Converts an unbalanced high impedance signal to a balanced low impedance signal.
Dynamic Range: The difference between the largest and smallest values a quantity can assume, such as volume.
Ground Lift: A switch on some audio devices that disconnects the cable shield. Used in attempts to stop hum induced by ground loops.
Ground Loop: Sometimes when connecting audio equipment to each other, a potential between the two devices’ grounds can occur which induces current flow at a frequency of the mains line voltage (60Hz in the US). This produces an unwanted audible hum in the signal.
Impedance: Measured in Ohms, it is the AC equivalent of resistance and represents opposition to current flow in a circuit.
Lavalier: A type of small microphone often clipped to a tie or garment.
Line Level: A signal with a higher voltage than Mic Level and is used between various audio devices before being sent to the amplifier.
Mic Level: A signal with a relatively low voltage.
Speaker Level: The highest voltage signal of the Mic, Instrument, Line, Speaker levels that has been amplified and can be sent to a passive loudspeaker.
TS: Tip-Sleeve phone audio connector. Used for an unbalanced mono signal.
TRS: Tip-Ring-Sleeve phone audio connector. Can be used as for an unbalanced stereo or balanced mono signal.
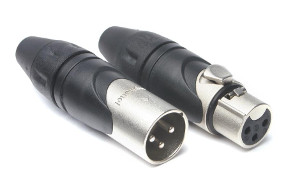
XLR: A balanced audio connector with three conductors used for connecting microphones and other audio equipment. Its balanced nature makes it ideal for longer cable runs.
Z: An abbreviation for electrical impedance.
Identifying Audio Noise
In order to speak more precisely when discussing audio noise problems, it may be useful to familiarize yourself with the different types of audio noise and how they are different from each other.
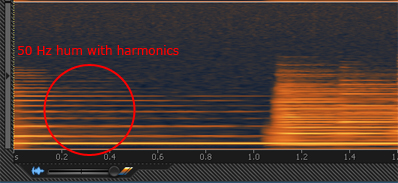
Hum
Hum (also called buzz) is a continuous sound that occur in a specific set of lower frequencies (often around 60Hz) and usually are caused by electrical interference by either bad audio connections or a ground loop condition. This is a video sample with a 60Hz tone.
Hiss
Hiss is a continuous broadband sound that occurs over a wider set of frequencies than hum and may be caused by fans, air conditioners, or analog sound equipment like tape cassettes.

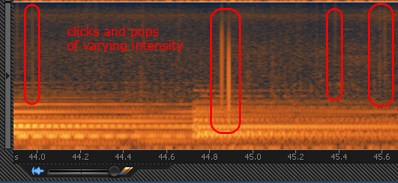
Clicks and Pops
Clicks and pops are short bursts of high level sound across the spectrum and can be caused by mechanical issues in analog systems like vinyl record players or signal processing errors in digital systems such as insufficient buffer sizes or latency.
Distortion
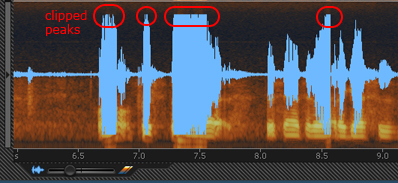
Distortion is any kind of alteration to the shape of a sound wave and is usually unwanted. There are different types of distortion, but the most common type is amplitude distortion (also called clipping).
Clipping occurs when the peaks and troughs of an audio signal gets “clipped” off due to the amplitude of the wave being higher in threshold than the audio device can handle. (Think of those unintelligible fast food drive-thru speakers.) Here is a video sample of clipping.
You can prevent distortion by reducing the sound levels on a device so that signals have enough “headroom” and do not trip the peak or clip indicators.
Feedback
Audio feedback is the loud unpleasant squeal that occurs when a loop occurs between an audio input and output, such as a microphone pointed at a loudspeaker. The signal gets continually amplified any may overdrive the speakers and cause potential damage, so immediate attention is required such as lowering the volume of the sound channel in question and pointing the microphone away from the amplification source. Here is a video sample of audio feedback.
Audio and Video Monitoring Procedure
Before You Begin
-
Avoid spills! If you must have a drink, make sure it has a cap or lid!
-
New volunteers shadow an experienced operator.
-
Minimize interruptions to MPS:
-
Do not blindly react to the monitoring feed: it is several seconds behind real-time. Observe the feed for several seconds to determine if problems persist before reporting. It sometimes freezes. Turn the toggle on and off again before reporting an issue.
About Monitoring Station
The monitoring station has two monitors. On these monitors you will see multiple windows including the Mothership Control, windows showing Talks, Camera Controls, and the Conference Schedule. In this section we will familiarize you with the station, so that you will be ready to following the monitoring procedures in the following sections.
Using the Mothership Control
Mothership Control displays a list of rooms and a toggle. You will be informed which rooms should be monitored at the start of your shift.
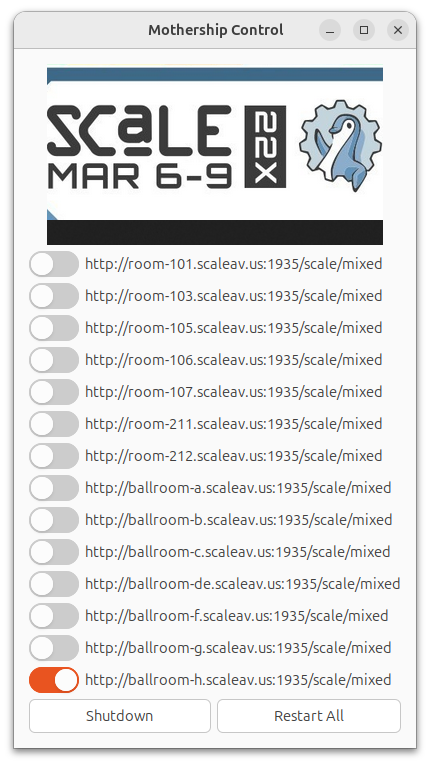
The system is designed so that any rooms which are toggled on will create a window on the screen, even if you try to exit out. Exiting out will restart the window.
Using Room Windows
The Room Window consists of a banner, a video feed, and a presentation feed.

You will be able to hear the audio from one room at a time. To hear the audio of a room, select a room’s window. You will only hear the audio while a room is selected. See Monitoring Audio Issues section for the full procedure.
Note that the Room Windows video can freeze. If the video freezes, use the toggle from the Mothership Control to restart the video, and then drag the window back where you had it.
Using the Camera Controls
The Camera Controls window displays a menu, the video from a room, and camera controls.
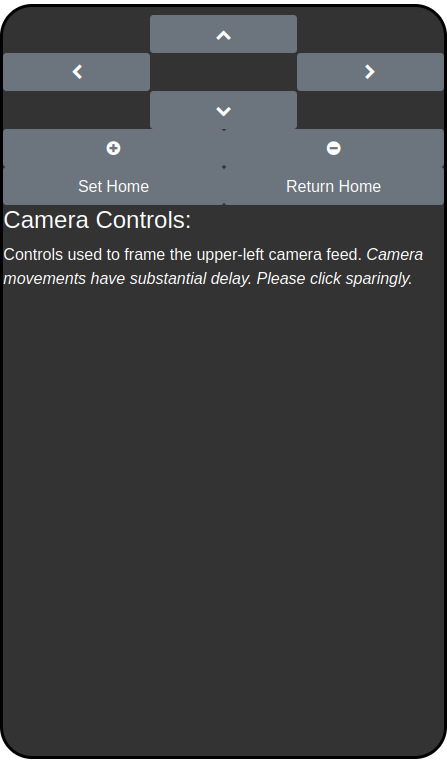
You will mostly use the Room Selection menu to select a room you want to control, and the movement controls to position the camera. See the Monitoring Video Issues section for the full procedure.
For experienced operators: If the Operations Control window is not open or crashes, open Firefox and use the address bar to open it again.
The web address is: + http://<room-letter/number>.scaleav.us/html-frontend/operate.html
Room Selection Menu
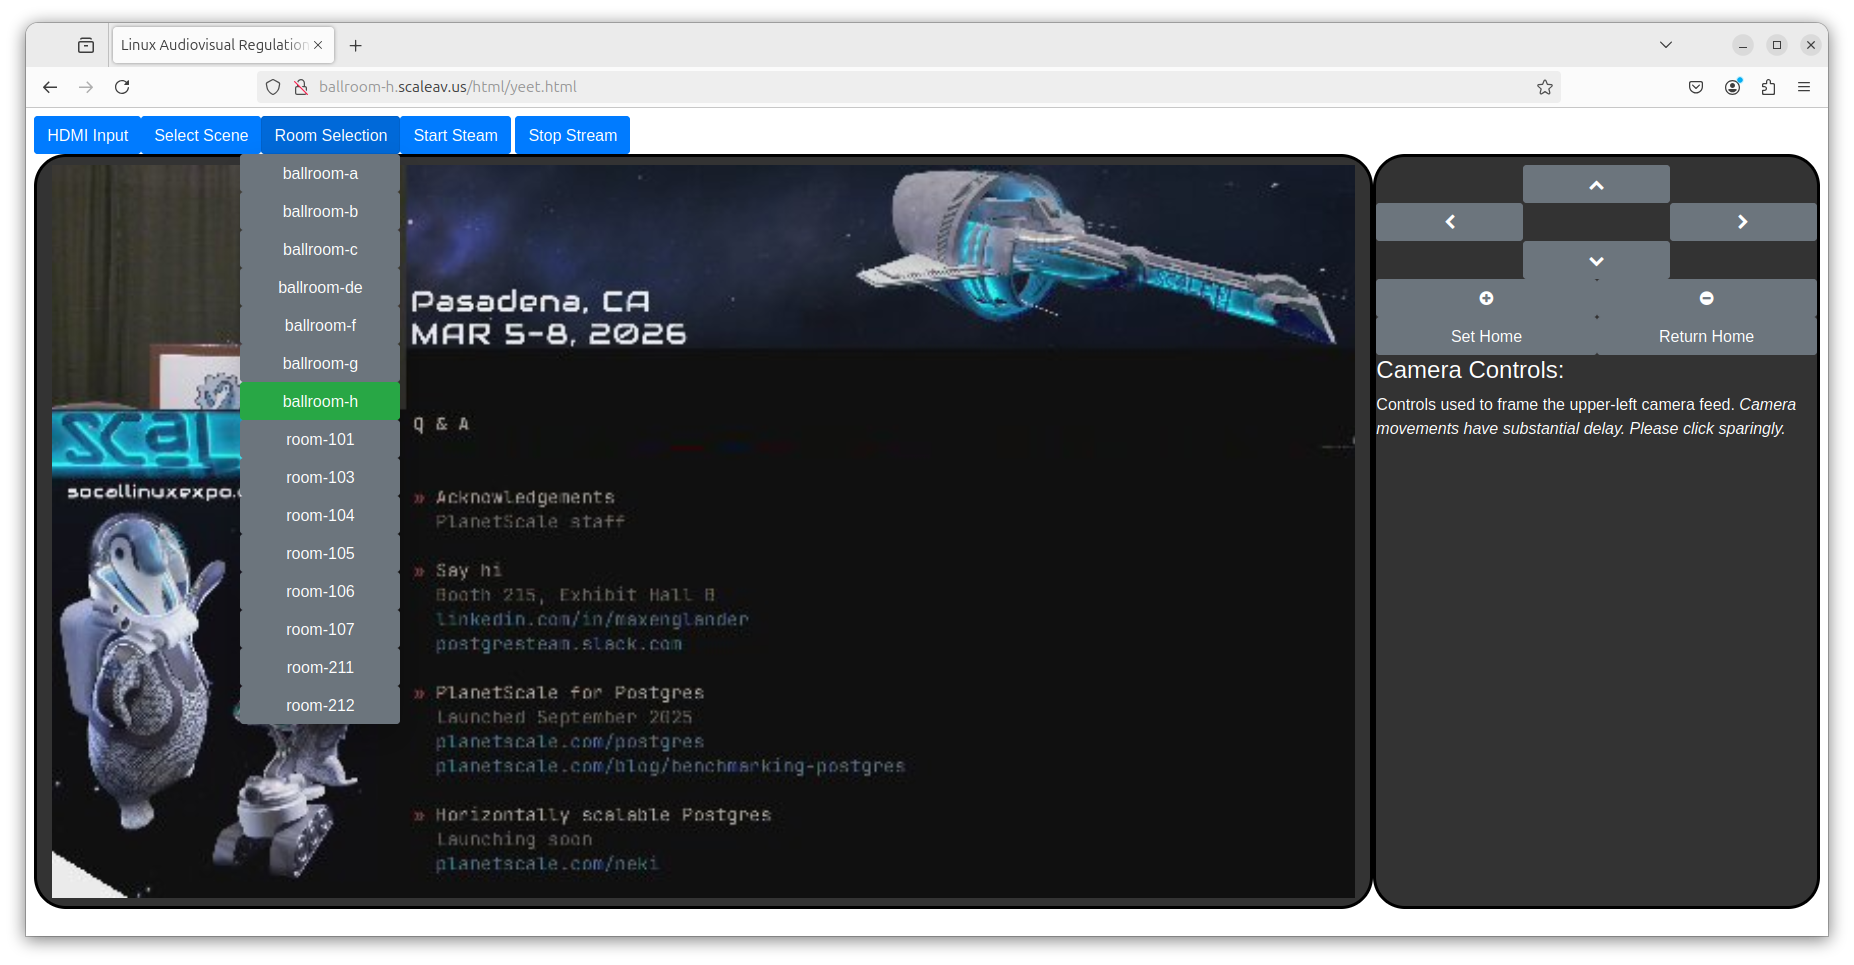
Select the Room you want to control from the Room Selection menu. When selected the video feed will appear and you can control the room’s cameras.
There are a few more menu items. Please do not use these without consulting an experienced operator.
HDMI Input
This menu controls which HDMI Input is set up to stream the feed. It can be useful in certain situations where the video isn’t showing.
Select Scene
This menu controls which window, the small window, or the large window, displays the video feed.
Monitoring Audio Issues
Examples of potential issues are:
-
Hum, hiss, clicks, and pops
-
Feedback
-
Inaudibly low sound
-
“Hot” audio (when audio is too loud, distortion and clipping is possible)
-
Unintelligible speech
If you are unsure whether you are hearing an audio problem, first check other rooms to get a feel for the baseline of what other rooms sound like.
If you determine there is an issue, then log the issue and ask Michael Proctor-Smith for help.
Monitoring Video Issues
Observe the video feed and confirm thatthe video of the speaker and presentation display properly.
Examples of potential issues are:
-
No slides showing: could be a problem on the speaker’s end.
-
Slides are cut off: the speaker may have misformatted the slides or has not configured their laptop properly to display at the correct resolution (1024x768@60Hz)
-
Video is choppy or it goes black: if the video goes black, make sure the projector is physically turned on, and still no picture/dark/black, then alert senior tech.
If you determine there is an issue, then log the issue and ask Michael Proctor-Smith for help.
Centering Speakers in the frame
-
Use the Camera Controls window to move the camera to ensure Speakers are centered in the frame.
-
If a speaker keeps leaving the frame (like pacing around), then you may want to zoom out.
-
Note when making camera adjustments:
-
Camera movement is sensitive. Just press a direction control once at a time.
-
There is a *small delay *between you pressing a button and the result showing up on screen.
-
Wait for this lag as you make adjustments.
-
-
Use the *Return Home*to automatically move back to the last known good position.
-
If you’ve moved the camera far away from the speaker, select Return Home to move back to the last known position of the speaker.
-
If using the Return Home button does not return to the speaker, manually find the location of the speaker and then select Set Home.
-
VLC/Monitoring Station Issues
If a VLC window goes completely black, you can reload the room feed in VLC by closing the window by pressing the X in the window title bar. A new VLC window will open in its place.
If the monitoring station computers are acting up, inform Michael Starch or Matthew Campbell
Last and Final Resort:
If the monitoring station computer crashes or freezes, you can restart the system:
-
Windows+Shift+E to exit the i3wm window manager.
-
Ask for Login Prompt
-
Display the Web Control Interface by opening up Firefox and entering the web address for a room.
-
New VLC windows of the various room feeds may open up stacked on top of one another, so move them around to space them out. To Reorganize the room windows, just move them around with the mouse.
-
Make sure the Audio for the VLC windows is set to Audio Track 2.
-
Check that the camera is displaying in the top right corner.
Room Equipment Connections
The following schematics show the various connections of all of the equipment in each room
Types of Audio Connectors
XLR
1 channel mono, balanced. Used for microphones, speakers, subwoofers, monitors, mixers, and due to its balanced nature and shielding is ideal for long distance cable runs.
1/4" TS Phone Connector
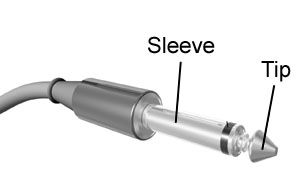
1 channel mono, unbalanced. Used for musical instruments and shorter audio device connections. Splitter cables such as stereo to two mono channels may use this type of plug.
1/4" or 1/8" TRS Phone Connector

2 channels of unbalanced stereo audio or 1 channel of balanced audio. Used to connect headphones and other consumer electronics. Available in quarter-inch and eighth-inch sizes. The eighth-inch size is also called 3.5mm.
RCA Connector
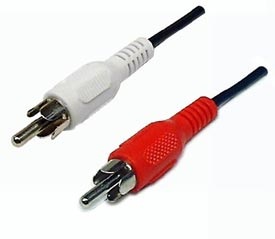
1 channel mono, balanced. Used to connect devices like CD/DVD players to mixers.
Audio Troubleshooting
For Experts Only
If there is noise, distortion, or imbalancing in any room, an audio-visual expert should be called in for assistance. An audio-visual expert is someone who has volunteered for SCALE for many years, and has experience setting audio-levels for both the room and the monitor feeds. The following procedure is for the experts.
-
Identify the primary issue in the room. What needs to be fixed? Audio issues differ in the proper fix, and so a clear understanding of the issue before doing any workis important and prevents further errors. Possible errors include:
-
-
Hum or buzz. There are generally two causes of constant hum/buzzing. Ground loop buzzing (60Hz buzz) is caused by audio equipment being grounded to different grounds in the facility. With multi-phase power this is easy to do. Possible solutions: connect equipment to the same ground (same electrical outlet); push the ground-lift switch on the DI Box <insert picture here>. Sometimes the issue could also be caused by poor shielding of the audio cable. First check to see that the audio cable is not crossing near any power cables, as this might be causing some of the hum. Additionally, look in the room for any malfunctioning fluorescent lights.
-
Distortion. Distortion is caused when signals are amplified too much. This often means gains are too high.Possible solutions: Before performing adjustments to the gains, check with AV NOC to ensure that there is distortion on the AV monitoring feed. If distortion is detected on the monitoring feed, Adjust the mixer board to bring down the gains. If distortion is not detected on the monitoring feed, do not adjust the gains, but reduce the volume knobs. See noise (iii)
-
Noise. General noise is a more difficult problem, but can be the result of amplifying the output to the speaker too high. Is the noise constant or intermittent? Possible solutions: If the noise is intermittent, the cable might be damaged. Follow the cable’s path and look to see if maybe the cable is/was being crushed by a chair or table leg or was laid down and bent at too narrow of an angle. In addition, check that connections between cables and equipment are secure.
-
Feedback. Feedback is the unintended “infinite loop” of amplification of a sound and can occur when a microphone is pointed toward a loudspeaker and the amplification is set too high. Solving this problem has two aspects: triage and solution. When it immediately happens, the sound is deafening to the audience, so your instinctual reaction should be to lower the master faders to stop the feedback. Once you’ve lowered the sound, then you can begin to think about how to prevent it. If this is a panel with multiple microphones, turn off unused microphones. The more microphones that are hot, the more likely feedback is to occur. Is one presenter standing near a loudspeaker? Turn down their gain.Note: before adjusting gains, please consult with AV NOC.
-
-
Identify the affected portion of the audio system. Problems with audio equipment can appear anywhere in the chain of the audio system. Once the affected portion is identified, work can focus there to resolve the issue, before expanding into other portions. This can keep the amount of work minimal. Parts of the audio system:
-
-
Single loudspeaker. If a problem affects one speaker and not the other then the problem is often with the built-in amplification in that speaker. Look there first. Is it turned on? Next, check the cables.
-
All loudspeakers. If a problem exists in multiple speakers,but notthe monitoring feed, the problem might be with the in-room audio mixer settings. Check to make sure the channels are not muted and that the channels and mix settings are appropriately set. Note:The monitoring feed is post-gain controls and thus these should not be adjusted unless the monitoring feed is also affected.
-
Monitoring feed. If a problem is reported on the monitoring feed, but is not apparent in the room, then the output settings to the monitoring feed are at fault. Confirm that the appropriate channels from the in-room audio mixer are being fed to the networked audio mixer. In addition, gains can be checked for this issue.
-
Inputs. If the problem is observed in both the monitoring feed, and the room, the problem likely exists with the inputs. Adjust there first. These include the gain settings.
-
-
Perform adjustments. Adjust the system to fix the above isolated problem, and perform the adjustments for the affected part of the system first. Remember, settings dialed far past unity gain (labeled “U” or “+0db” on most systems) are often likely to be contributing to the problem.
-
Rebalance. Once the issue is solved, the other affected settings should be adjusted as minimally as possible to ensure that the room still operates normally. Move along the chain of settings from the inputs to outputs.
-
Re-test.
Things to keep in mind:
-
One debugger at a time. Only one individual should be touching settings at a given time. Far too much time has been lost in past years when 2 debuggers are adjusting 2 settings at 1 time. If another volunteer has a suggestion, formally hand-off ownership of the debug.
-
Be procedural. Work an area of the system from input to output.Don’t just randomly adjust settings.
-
Fix one setting at a time. As much as possible, fix a setting, test it independently (with headphones) and then move on to the next setting. Varying 2 settings at once is usually a bad idea.
-
Minimal changes are best. Keep adjustments small, and line levels low but sufficient to do the job.
-
Unity gain is good. Going far past unity usually should be reasoned through as it often causes the aforementioned problems.
Volunteer Logistics
Here is some useful information for volunteers.
Communications
-
Email: Announcements and discussions usually occur on the scale-av mailing list. Please sign up early, as it requires approval to add your subscription.
-
Radio: During the event we use two-way radios to stay in communication with each other in the field. Please check out a radio from the A/V NOC.
-
Slack: We are also encouraged to use Slack to chat. You can download the app to your smartphone or login via your computer. Please ask Ilan (@socallinuxexpo.org) or Bala (@socallinuxexpo.org) for an invitation, so you can access our team channels.
-
Old fashioned, offline messages: If you’re a fan of writing things on sheets of dead trees, or there’s a power outage and the world is going to end but you still need to relay a message, you can leave a message at the front desk of the A/V NOC between 8am-6pm.
Registration
Volunteers for the A/V team will receive a free badge. SCALE Registration for volunteers was handled by the team lead. We submit a list of names to registration a few weeks before the conference. You should have received an email confirming your registration for SCALE, if not, please contact Lan.
You will not be able to pick up your expo badge until the registration area has been set up late Wednesday night or Thursday morning. The registration area is near the entrance to the Expo Hall, on the convention center side.
It is the same process for staff or attendees to pick up a badge. You go to Registration, check-in via the bank of self-service kiosks. If you received an email from registration, there is an express check-in code. If you didn’t get the email or misplaced it, just enter your first and last name and the email address you used to sign up as a volunteer. The printer will print your badge and you can then pick up your shirt and swag.
After you’ve picked up your badge, you can check in with Lan at the A/V NOC in room 204. We’ll get you oriented. We also have staff tshirts for the A/V team. Please wear them when you’re working. Depending on availability, we will hand out multiple shirts so you can wear them multiple days.
Hotel Rooms
SCALE attendees are primarily staying at on-site Sheraton hotel or the offsite Hilton hotel 5 minutes away.
SCALE provides a small number of hotel rooms for volunteers who are working for most of the conference. This is a privilege offered to volunteers who have done good work for us before, because we work long hours, and staying onsite is safer than a long commute.
You should have already received a confirmation email directly from the hotel, as well as an email from Ilan telling you to please contact him and not the hotel if you want to change anything about your registration.
SCALE will only cover the room and the parking. The hotel will require a credit card on file to cover any extra charges. Be sure to let them know if you need a parking pass. If you don’t need a car, you should consider taking Uber/Lyft to the hotel if it is under $25/each way; that may be reimbursable with the receipt. You should also ask about whether the room includes free internet access, and if so, what the code is.
Parking
Here is the general information regarding parking at the venue or around Pasadena. You may also consider carpooling or other modes of transportation.
SCALE will handle parking reimbursement after the conference, within reason. Please be frugal as SCALE has a lot of expenses with the new venue.
Shuttles from nearby hotels to the convention may be available. Ask your hotel front desk for information.
Meals
Boxed lunches will be provided for on-site volunteers in the volunteer break room, which is Room 208. Pastries are sometimes available in the morning. Dinners are provided via prepaid debit-cards that reload nightly. Outside food and beverages are not permitted in the venue.
There are many restaurants and shops around the venue, so there should be plenty of options if you want to find your own food.
Shifts
The bulk of volunteers are needed from 8am to 6pm. We are aiming for 5-hour shifts in the morning and afternoon, which overlap around noon.This should enable you to enjoy the conference and prevent you from having too long of a day.
We will need at least one volunteer with audio mixer experience to support the evening events. Hopefully, this duty will rotate to a different volunteer each night.
Please fill out the doodle poll to list your availability. It is extremely easy to update your availability.
Training
Training will be provided onsite. There are many veteran volunteers who can answer basic questions. This book was created to also provide documentation of all of the procedures and equipment used by the team.
Questions
Lan Dang is the volunteer coordinator for the SCALE A/V Team. Her goal is to make sure SCALE A/V is well-supported and that you have a good experience and want to come back to help out again next year. Address all questions, concerns, and complaints to her.
VGA Distribution Amplifier
Use a D.A. to help amplify the video signal in a room where the projector image seems unstable or weak.
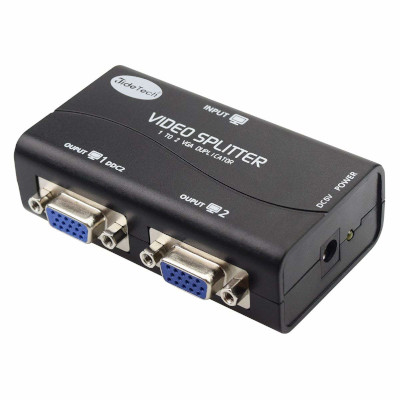
Kit Contents:
-
1x VGA Distribution Amplifier (labeled Video Splitter)
-
1x USB cable for power
-
1x VGA cable for Output #1
Connection Instructions:
-
Connect the VGA In from the Podium Computer to Output #1 of the DA using the VGA cable
-
Connect the Projector VGA cable to Output #2 of the DA.
-
Connect the Presenter’s Laptop VGA cable to the Input port of the DA.
-
Connect the USB power cable to a free USB port on front of the Podium Computer